November 13, 2023

Color code the cell in Excel export

Hi Folks, 

Below is a sample code to color code your Excel cell while exporting. In this code, we will be using two assemblies as below

using OfficeOpenXml;
using OfficeOpenXml.Style; 

and standard Excel export code with a bit of creativity, 


You can be more creative by writing separate methods for major colors and calling them based on cell values. 

-Harry Follow us on Facebook to keep in rhythm with us. https:fb.com/theaxapta

October 24, 2023

[Solved]Error while importing/Exporting opening balances DIXF (No active format for data entities has been set up)

Hi Folks, 

We were trying to import some opening balances and encountered some issues which say error as below,  

Error 1:

Results. The account type Ledger is not valid
Results. Validations failed

Error 2:

Results. No active format for data entities has been set up.
Set up an active format for each dimension format type.
Results. Error found when validating record.
Data written to target 'General journal' ('0' records created, '0' records updated)


Solution:

To fix this issue, Navigate to the below form

"General ledger > Chart of accounts > Dimensions > Financial dimension configuration for integrating applications"

Now here you need to set up two records as below, please make a note of the 'Dimension format type' and select the required dimension from available dimension types. 


Save your changes and retry to import/export your file, it should work this time. 

If you want to learn more about this specific form, I would recommend reading below Microsoft document.


-Harry Follow us on Facebook to keep in rhythm with us. https:fb.com/theaxapta

October 03, 2023

[Solved] Parameter issue with SSRS report

If you are reading this post, my humbly empathy with you, you are one of the victims of the SSRS report. :)

I am not diving on exact error messgae you may getting while build/deploying report. 

Lets understand the root casue of this first, 
..
.
.
.
.
.
.
.
.
.
.
.
.
.

There is no root cause. Its just SSRS, 


Well, if you open SSRS report in XML editor (by right click on report and Open with), you will total two place where parameters are defined. (In case there is one datasource in report, there be more place if there are more than one datasource)
Take a close look on all three and makre sure all of them having same number of paramters , plus same name of each paramater.

1. Under node: Report dataset parameter


2.  Under node : ReportParametersLayout, 


well, this one is reall yintesting as you also needs to make sure of changing the ColumnIndex or RowIndex.

-Harry Follow us on Facebook to keep in rhythm with us. https:fb.com/theaxapta

September 15, 2023

QuickFix: Company doesn't exit error on report


In my case it was an issue with the wrong extends of the contract class (of course this happened because of poor copy-paste skills :) ) Check the contract class if you have extended with the SrsReportRdlDataContract class, instead of this you need to add DataContractAttribute on top, that it.


-Harry Follow us on Facebook to keep in rhythm with us. https:fb.com/theaxapta

September 06, 2023

Supercharging Dynamics 365 F&O implementation with Azure DevOps

Hi Folks, 

Here is the recording of the session delivered on 31st August, it primarily targeted below topics, 


and of course an interactive demo around those topics, 


-Harry Follow us on Facebook to keep in rhythm with us. https:fb.com/theaxapta

August 22, 2023

QuickFix: Error while build SSRS report

Error Message:


Severity Code Description Project File Line Suppression State
Error Path: [AxReport/<ReportName>]:"An unhandled exception was thrown while validating <ReportName>with callstack System.InvalidOperationException: Sequence contains no matching element
   at System.Linq.Enumerable.Single[TSource](IEnumerable`1 source, Func`2 predicate)
   at Microsoft.Dynamics.AX.Metadata.Extensions.Reports.AxReportDataSetParameterExtensions.GetAssociatedReportParameter(AxReportDataSetParameter datasetParameter, AxReport report)
   at Microsoft.Dynamics.AX.Metadata.Validation.DataSetParameterConstraint.Validate(ModelValidationContext context, AxReportDataSetParameter element)
   at Microsoft.Dynamics.AX.Metadata.Validation.AxReportValidator.ValidateDataSets(AxReport report, ModelValidationContext validationContext)
   at Microsoft.Dynamics.AX.Metadata.Validation.AxReportValidator.DoValidate(AxReport report, Uri uri, IMetadataProvider metadataProvider, IDiagnosticSink diagnostics)
   at Microsoft.Dynamics.AX.Metadata.Validation.ValidatorBase`1.StartValidation(T objectToValidate, Uri uri, IMetadataProvider metadataProvider, IDiagnosticSink diagnostics)."


Fix: Sorry to say in this way, but simply create a completely new report and copy the design from the current to the new report, this should work.


-Harry Follow us on Facebook to keep in rhythm with us. https:fb.com/theaxapta

July 31, 2023

[Solved] Unable to find a feature in 'Feature management' workspace

If you are struggling to find a required feature in the 'Feature management' workspace, simply click on 'Check for updates' and most hopefully the feature you are looking for will start appearing in the list. 


-Harry Follow us on Facebook to keep in rhythm with us. https:fb.com/theaxapta

July 10, 2023

QuickFix: Golden config database promotion to UAT

Hi Folks, 

If you are reading this post, I would assume you already followed Microsoft docs on the same topic but are unable to follow all the steps as it says. 

Here is the MS doc URL, 


There is a wrong command example that asks you to navigate to the SQL folder as below (Export the database from SQL Server)


Actual the path for SWL is wrong, the correct path should be as below, 

C:\Program Files\Microsoft SQL Server\160\DAC\bin

I have raised this with Microsoft and hopefully, this will be fixed soon. 

Cheers


-Harry Follow us on Facebook to keep in rhythm with us. https:fb.com/theaxapta

July 03, 2023

A complete Guide - Configuring Power BI in Dynamics 365 Finance and Operations (D365FO)

Introduction:

Power BI is a powerful business intelligence tool that enables users to visualize and analyze data from various sources. When integrated with Dynamics 365 Finance and Operations (D365FO), Power BI can provide insightful reports and dashboards, empowering organizations to make data-driven decisions. In this blog post, we will walk you through the process of configuring Power BI in D365FO, allowing you to harness the full potential of these two Microsoft tools.

There are many default Power BI report available, and you can also develop and integrate your own reports. Let's follow the below steps to configure this in a Tier 2 environment as Microsoft doesn’t support Tier 1 environments for Power BI anymore.

Step 1: Accessing the Power BI service:

To begin the configuration process, you need to have access to the Power BI service. Visit the Power BI website (https://powerbi.microsoft.com/) and sign in using your Microsoft account credentials. Make sure you use the same account for all the below steps as well.

Step 2: Register the Power BI application:

In the Power BI configuration form, click on the "Register new app" button. This step will prompt you to sign in with your Power BI account credentials and authorize D365FO to access your Power BI resources. Check this post for step by step guide for app registration.

Once the app is registered you need to enable below API permission, 

I. Content :

Content. Create

II. Dashboard

Dashboard.Read.All

III. Dataset

Dataset.Read.All

Dataset.ReadWrite.All

IV. Report

Report.Read.All

V. Workspace

Workspace.Read.All

Step 3: Grant Permissions in Power BI Service:

Switch back to the Power BI service and navigate to "My workspace" or the desired workspace where you want to embed D365FO reports. Click on "Settings" and then "Admin portal." In the admin portal, select "Workspace settings" and choose the workspace where D365FO reports will be embedded. Under "Members," add the D365FO user account or security group that requires access to the Power BI reports.

Step 4: Setup Power BI Integration in D365FO:

In the D365FO environment, navigate to System Administration > Setup > Power BI configuration. Enable the Power BI integration by checking the "Enable Power BI Integration" checkbox.

Add application id and client secrete id which you got from App registration. Do the authentication on Power BI.

Step 5: Deploy Power BI Reports in D365FO:

Navigate to System Administration > Setup > Deploy Power BI files. Select your required report and on the top action pane, select ‘Deploy Power BI file’. You may get an error like below

‘Deployment failed for <Report Name>’, this is because you didn’t log in to PowerBI.com yet. Please follow step 1 and validate if you are able to see  ‘My workspace’ at the bottom left of the screen.

Step 7: Embed Power BI Reports in D365FO:

In D365FO, open the desired workspace where you want to embed the Power BI report. Click on "Options" and select "Personalize this form." Edit the form and add a Power BI tile to the desired location. Provide the "Report URL" or "Dashboard URL" for the Power BI report you want to embed. Additionally, you can specify filters and parameters based on your requirements.

You may get an error on the workspace similar to below

QueryUserError

To fix this issue you need to make sure the respective entity store is refreshed successfully. If you are facing an issue with the refresh, check out this post. 


Step 8: Save and Publish the Changes:

Save and publish the changes made to the form in D365FO. The Power BI report tile will now be visible to users in the designated workspace, allowing them to access and interact with the embedded reports.

Conclusion:

Configuring Power BI in Dynamics 365 Finance and Operations opens up a world of data analysis and visualization possibilities. By following these step-by-step instructions, you can seamlessly integrate Power BI with D365FO, enabling your organization to leverage insightful reports and dashboards to make informed decisions. Remember to ensure appropriate permissions and access control settings to maintain data security and governance. With Power BI and D365FO working together, you can unlock valuable insights and drive business success.


-Harry Follow us on Facebook to keep in rhythm with us. https:fb.com/theaxapta

June 17, 2023

Step-by-Step Guide to Azure App Registration Process

Introduction:

Azure App Registration is a crucial step when developing applications that integrate with Azure services. It allows your application to authenticate and access resources securely within the Azure ecosystem. In this blog post, I will provide a comprehensive, step-by-step guide to the Azure App Registration process, helping you understand the necessary steps to register your application.

App registration is required for a lot of purposes in D365FO, for example

1.    To set up Warehouse mobile

2.    Setup out of box Power BI report

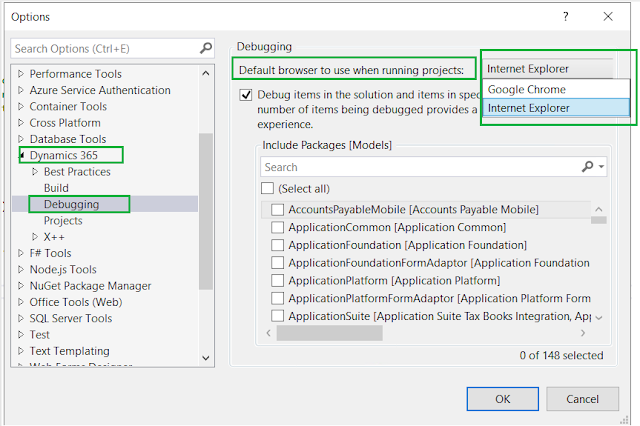
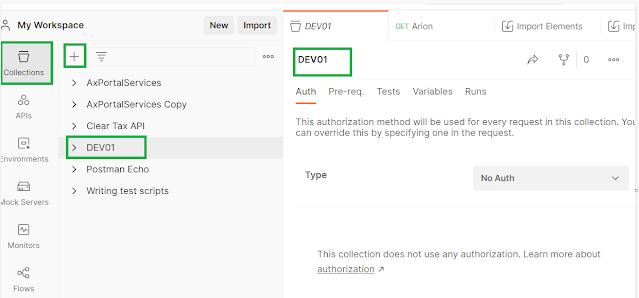
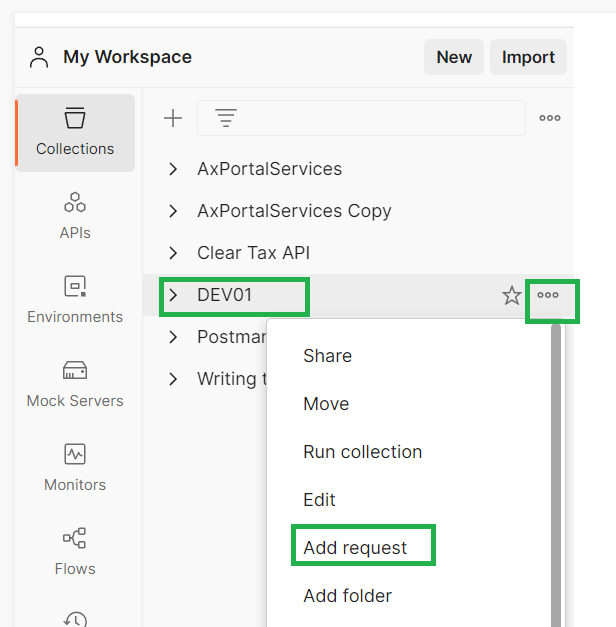
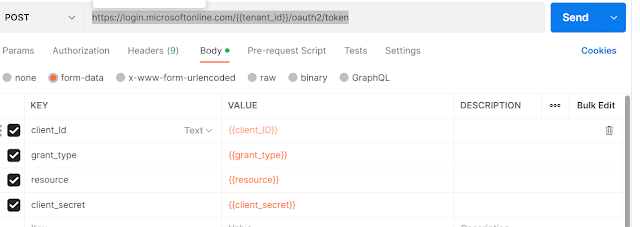
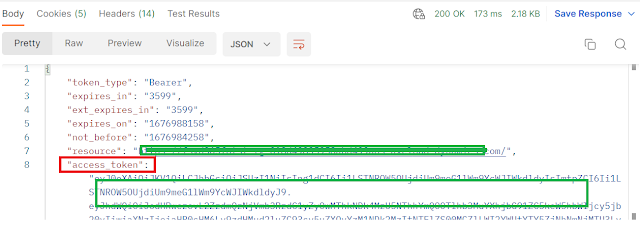
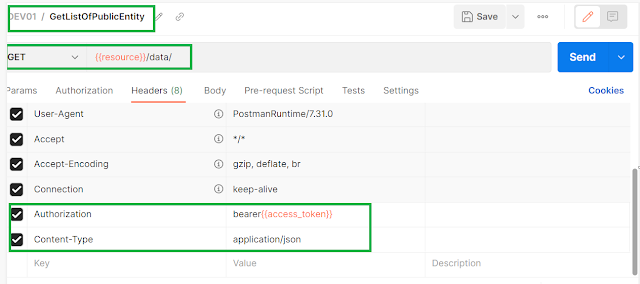
3.    Postman configuration

4.    Various integration scenarios


Prerequisite: Just one, get the admin account and use the same account for all the steps, this account should have access to D365FO as well.  (I know it's not mandatory but I would recommend this.)

Step 1: Access the Azure Portal:

To begin the Azure App Registration process, log in to the Azure Portal (https://portal.azure.com) using your Azure account credentials. Once logged in, you'll have access to the Azure dashboard.

Step 2: Navigate to Azure Active Directory:

From the Azure dashboard, locate and select "Azure Active Directory" from the list of available services. Azure Active Directory is a comprehensive identity and access management solution provided by Microsoft. (To make sure you choose the right directory).

Step 3: Choose "App Registrations":

Within Azure Active Directory, navigate to the "App registrations" section. This section allows you to manage all your application registrations. You can search for the same in the top search bar.

Step 4: Click "New Registration":

Click on the "New Registration" button to initiate the app registration process. You will be prompted to provide essential details about your application.


Step 5: Fill in Application Details:

In this step, you need to provide the following details:

- "Name": Enter a unique name for your application.

- "Supported account types": Choose the appropriate account type (such as "Accounts in this organizational directory only" or "Accounts in any organizational directory"). Mostly it will be within the same organization.

- "Redirect URI": Specify the URI where Azure will redirect users after authentication. This is typically the URI of your application. In our case, it will be the URL of D365FO environment.

Step 6: Register the Application:

After providing the necessary details, click on the "Register" button to create the application in Azure. Azure will generate a unique "Application (client) ID" that you will need to use during the development and configuration of your application.


Step 7: Configure API Permissions:

To access Azure resources from your application, you need to grant it appropriate permissions. In the app registration page, navigate to "API permissions" and click on "Add permission." Here, you can select the APIs and permissions required for your application. This section is used if you are going to use this for Power BI.


Step 8: Grant Admin Consent:

Once you have configured the necessary API permissions, you need to obtain consent from an Azure administrator. Click on the "Grant admin consent for <your organization name>" button to initiate the consent process.


Step 9: Generate Client Secrets:

If your application requires a client secret, such as when using the OAuth 2.0 client credentials flow, navigate to the "Certificates & secrets" section within the app registration page. Here, you can create and manage client secrets securely. Copy the value securely as it will not visible after this step and you need this for most of the applications eg. the Warehouse mobile app, and Power BI configuration.


Step 10: Application Configuration (Optional):

After completing the app registration process, you can configure additional settings specific to your application, such as branding, authentication options, and more. Explore the app registration page and adjust the settings as per your requirements.


Conclusion:

The Azure App Registration process is a vital step when building applications that integrate with Azure services. By following this step-by-step guide, you can successfully register your application in Azure Active Directory, configure necessary permissions, and obtain the required credentials for secure authentication and access to Azure resources. Properly registered applications can take advantage of various Azure services and APIs while ensuring a streamlined and secure development process.


-Harry Follow us on Facebook to keep in rhythm with us. https:fb.com/theaxapta

June 09, 2023

How to add security on a specific control on form

Hi Folks, 

In this post, I will discuss how to enhance security for a specific form control, such as a button or checkbox. Typically, we would use the DisplayMenuItem feature to manage security privileges. However, things can become a bit different when you want to assign special security privileges to a particular form control.

Here's a standard approach to achieving this. Please follow the steps below:

1.              Begin by navigating to the form design and selecting the desired form control to which you want to add additional security privileges.

a.     Set the property 'Need permission' to 'Yes'. This step will make the field available in Step 5.

2.         Create a new privilege. If an existing one suits your requirements, feel free to use it.

3.         Within the privilege settings, locate the 'Form control permission' section.

4.         Add a new form here.

5.         Include the control on this form and adjust its properties accordingly.

By following these steps, you can implement enhanced security measures for specific form controls.


-Harry Follow us on Facebook to keep in rhythm with us. https:fb.com/theaxapta

June 06, 2023

Simplifying Data Retrieval with D365FO X++ Lookup Method

Simplifying Data Retrieval with D365FO X++ Lookup Method

Simplifying Data Retrieval with D365FO X++ Lookup Method

Introduction

Microsoft Dynamics 365 for Finance and Operations (D365FO) is a powerful ERP system that offers robust customization capabilities. One such customization option is the ability to write X++ code for lookup methods. These methods can greatly simplify data retrieval and enhance the user experience within the application. In this blog post, we will explore the lookup method in D365FO X++ code and provide a sample code snippet to demonstrate its usage.

Understanding the Lookup Method

The lookup method in D365FO X++ code allows developers to retrieve data from related tables or data sources based on specified criteria. It enables users to select a value from a predefined set of options, providing a seamless way to populate fields with accurate and relevant information. The lookup method essentially acts as a search functionality within the application, making it easier for users to find and select the desired data.

Sample Code

    
public static void lookupDemo(FormStringControl _control)
{
    SysTableLookup        sysTableLookup;
    QueryBuildDataSource  queryBuildDataSource;
    QueryBuildRange       queryBuildRange;

    sysTableLookup = SysTableLookup::newParameters(tablenum(CustTable), _control);
    queryBuildDataSource = sysTableLookup.addDataSource(tablenum(CustTable));

    // Adding a range to filter the lookup results
    queryBuildRange = queryBuildDataSource.addRange(fieldNum(CustTable, AccountNum));
    queryBuildRange.value("1001");  // Setting the filter value

    sysTableLookup.performFormLookup();  // Opening the lookup form
}


Explanation

In the above code, we start by creating a new instance of the SysTableLookup class, passing the target table and the control where the lookup will be displayed as parameters. In this case, we use the CustTable table and the _control argument, which represents the form string control.

Next, we add a data source to the lookup using the addDataSource() method. Here, we specify the table we want to retrieve data from (in this case, CustTable).

To filter the lookup results, we add a range using the addRange() method on the queryBuildDataSource. In this example, we filter the results based on the AccountNum field and set the filter value to "1001".

Finally, we call the performFormLookup() method on the sysTableLookup object, which opens the lookup form for the user to select the desired value.

Conclusion

The lookup method in D365FO X++ code provides a convenient way to retrieve and display data from related tables or data sources. By implementing lookup functionality, developers can enhance the user experience by simplifying data selection and ensuring the accuracy of entered values. The code snippet provided above serves as a starting point for utilizing lookup methods in your D365FO customization projects. Experiment with different tables, filters, and fields to tailor the lookup functionality to meet your specific business requirements.

-Harry Follow us on Facebook to keep in rhythm with us. https:fb.com/theaxapta

May 19, 2023

Configuring Azure Key Vault Parameters in Dynamics 365 Finance and Operations

Configuring Azure Key Vault Parameters in Dynamics 365 Finance and Operations

Configuring Azure Key Vault Parameters in Dynamics 365 Finance and Operations

Introduction:

In this blog post, I will guide you through the process of configuring Azure Key Vault parameters in Dynamics 365 Finance and Operations (referred to as FinOps). This configuration is particularly useful for integration scenarios where sensitive data, such as security keys or certifications, needs to be securely stored. By leveraging Azure Key Vault, we can ensure data encryption and proper management of cryptographic keys and certificates.

Prerequisite Steps:

Before we dive into the configuration, let's go through some prerequisite steps to set the stage for a seamless setup:

  1. Create a Key Vault: Begin by creating a Key Vault in the Azure portal and make a note of the Value URI, which can be found in the overview tab. This Value URI will be needed during the configuration process.
  2. Add Certificates, Secrets, and Keys: Next, add the necessary certificates, secrets, and keys to your Key Vault. These items are essential for secure data storage and retrieval.
  3. App Registration in Azure: Perform an app registration in the Azure portal and store the generated Client ID and Secret Key. This registration will enable secure communication between Dynamics 365 Finance and Operations and the Azure Key Vault.

Configuration Steps:

Now that we have completed the prerequisite steps, let's proceed with the actual configuration of Azure Key Vault parameters in Dynamics 365 Finance and Operations:

  1. Navigate to D365FO: Go to the D365FO application and access the System Administration module.
  2. Open Key Vault Parameters: Within the System Administration module, locate and open the "Key Vault Parameters" form.
  3. Create a New Record: Create a new record in the Key Vault Parameters form, and fill in the required details for the configuration.
  4. Certification Tab: Switch to the Certification tab within the Key Vault Parameters form. Here, you will add the necessary information for each certificate, including Name, Description, Secret, Secret Type, and Version (if applicable). The Secret field should contain a reference to the certificate in the format: vault://<KeyVaultName>/<SecretName>/(Version if any). Set the Secret Type to "Certificate."
  5. Validate Configuration: Click on the Validate button to ensure the settings are properly configured and functioning as expected.

Code Example:

To demonstrate how to access the configured certificate in your code, consider the following sample code snippet:

public class TheAxaptaAccessKeyVault
  {
      public static void main(Args _args)
      {
          KeyVaultCertificateTable kvcTable;
          str value;

          kvcTable = KeyVaultCertificateTable::findByName("TestKeyVault");
          value = KeyVaultCertificateHelper::getManualSecretValue(certTable.RecId);

          info(value); // This will retrieve the value stored in the certificate.
      }
  }

Conclusion:

Congratulations! You have successfully configured Azure Key Vault parameters in Dynamics 365 Finance and Operations. Now you can securely store and access sensitive data, such as certificates and keys, ensuring the highest level of data protection. Implementing this configuration will greatly enhance your integration scenarios and data security practices within the Dynamics 365 environment.

Happy configuring and coding!

#Dynamics365 #Azure #KeyVault #DataSecurity #Integration #Configuration

-Harry Follow us on Facebook to keep in rhythm with us. https:fb.com/theaxapta

April 30, 2023

Azure Key vault parameter setup in D365FO

Hi Folks, 

In this post, I am going to share how to configure Azure key vault parameters in Dynamics 365 Finance and Operations  (Let's call it FinOps until we have a new name from Microsoft :) ).

First, let's understand what the use of this form is, This is primarily used for integration scenarios where a business needs to save sensitive data like security keys or certifications and a functionality or application working with this data must support data encryption, working with certificates, etc. As the cloud version of Microsoft Dynamics 365 for Finance and Operations doesn't support local storage of certificates, customers need to use key vault storage in this case. The Azure Key Vault provides the opportunity to import cryptographic keys, and certificates to Azure, and to manage them.


Now let's see some prerequisite steps, 

1. Create a key value on the Azure portal and note the Value URI. This is available on the overview tab.

2. Add your certificate, Secrate, and keys.
3. On the Azure portal, do an app registration and store the client Id and secret key.  
4. Now navigate to D365FO > System admin > Setup > Key Vault Parameters
5. Create a new record and fill below details


6. On the certification tab, add below for each certificate 
Name
Description
Secret – Enter a secret reference to the certificate in the below format
vault://<KeyVaultName>/<SecretName>/(Version if any)
Secret Type: Certificate

7. Click on Validate button to check the setting. 

That is all, now you should be able to access this certificate in your code, here is a sample code to access the certificate, 

public class TheAxaptaAccessKeyVault
{
    public static void main(Args _args)
    {
        KeyVaultCertificateTable    kvcTable;
        str                                        value

         kvcTable  = KeyVaultCertificateTable::findByName("TestKeyVault");
        value         = KeyVaultCertificateHelper::getManualSecretValue(certTable.RecId);

        info(value); //This will give you stored in the certificate. 
}

Cheers!!!

-Harry Follow us on Facebook to keep in rhythm with us. https:fb.com/theaxapta

April 12, 2023

Unable to restore database into DEV/Tier-1 instance

Hi Folks, 


When trying to restore a DB backup (.bak file) to one of the DEV boxes I was getting a strange error (initially it was strange :) ). The backup file was the size of about 50GB and I have disc space available of about 400GB but still, system was reporting issues for size. 


Possible reason: When we create a backup from SQL management studio, it contains only the used data pages and the backup file can be compress, while the actual database can be much larger then the backup file itself.

Solution: To verify the actual size of database, you can right-click on the database (at source) and check the properties, you will get the actual size of the Database itself. Now when you have the required size details with you, just make sure you have the space available in target system. 
Now, as the dev box is hosted on your Azure subscription, you have much more control over this. You can change the disk size from Azure portal. 

Cheers!!!
-Harry 

Follow us on Facebook to keep in rhythm with us. https:fb.com/theaxapta

March 04, 2023

QuickFix: Set default browser in Visual studio for debugging

Introduction:
In the realm of Dynamics 365 development, encountering issues when debugging and finding that Visual Studio opens objects in Internet Explorer (IE) can be quite frustrating. Although Microsoft no longer officially supports IE, this peculiar behavior persists. Fortunately, there is a simple solution: changing the default browser within Visual Studio. In this blog post, we will guide you through the steps to configure your preferred browser, such as Chrome, for seamless debugging in Dynamics 365.

Step 1: Navigating to Visual Studio Extension
To begin, open Visual Studio and access the "Extensions" menu.

Step 2: Dynamics 365 Extension Options
Within the "Extensions" menu, locate and select the "Dynamics 365" extension. This will open the options panel specific to Dynamics 365 development.

Step 3: Debugging Configuration
Within the Dynamics 365 extension options, find and select the "Debugging" section.

Step 4: Modifying Default Browser
In the Debugging section, you will find the option to modify the default browser used for object debugging.

Step 5: Set Preferred Browser
Choose your preferred browser, such as Chrome or any other compatible browser, as the default option for object debugging.


Conclusion:
By following these simple steps, you can easily resolve the issue of Visual Studio opening objects in Internet Explorer during debugging sessions in Dynamics 365. Take control of your debugging experience and choose a browser that aligns with your preferences and development requirements.

Happy debugging and seamless development!

#VisualStudio #Dynamics365 #Debugging #Development #BrowserConfiguration

-Harry Follow us on Facebook to keep in rhythm with us. https:fb.com/theaxapta

February 25, 2023

Best way to do Postman setup with D365FO

Hi Folks, 

There are very simple steps to do initial setup between Postman and D365FO environment. Please follow below steps.

(Make sure you have added a record in 'Azure Active Directory applications' in D365FO under Sys admin > setup > Azure Active Directory applications )

1. Download postman from here and install on you machine.

2. Do app registration on Azure portal, and make sure you copy all details from app registration to a safe place as not all information will available for later use.

3. Go to environment in left pane and create a new environment, you can name it as same as your D365FO environment like DEV01, UAT, Test etc. This also help when you are working with multiple environment and you keep using same get/post script to access different environments. 

4. Add all the variables here as below

Client_ID: You will get it from Azure app registration. 
grant_Type: client_credentials
resource: D365FO environment URL i<https://D365FOUrl/>
client_secret: You will get it from Azure app registration. 
tenant_id: You will get it from Azure app registration. 
access_token: To generate access token follow step 9.


5. Now create new collection and name it with your environment name eg. Dev01


6. Next, click on 3 dots next to collection name and select 'add request'


7. Name this request as 'Authorization', you can name it as per your use like getting public entities details or get a specific entity data or metadata. In the post request paste below as is.

https://login.microsoftonline.com/{{tenant_id}}/oauth2/token


8. Select 'From-data' in body and set below details.


Now you see we parameterize most of things and you don't need to create multiple request for different environments, you can simple change the environment from right top corner. 

9. Now,  Click on send button and you should get a status 200 message with access token. 
You can add the access token to your environment variable. 

Here we have completed the Postman setup. Now you can try few things to explore this further

10. Add one more request in your collection, and add details as below to get list of public entities. 


-Harry Follow us on Facebook to keep in rhythm with us. https:fb.com/theaxapta

February 04, 2023

QuickFix: [Solved] SSRS Report Deployment failed - The number of defined parameter is not equal to the number of cell definitions in the parameter panel

While duplicating an SSRS report for customization sometimes you may face this error at the time of report deployment. 

Error Message:
"SSRS Report Deployment failed - The number of the defined parameters is not equal to the number of cell definitions in the parameter panel."

Solution

The first thing you need to check for any extra parameter is this report, compare with the standard report. There are two places you need to compare
1. DataSet parameters
2. Report Parameter


There might be an extra parameter(s), try to remove this extra parameter from the report. In case you are unable to delete it from the front end you need to open the report in XML (Right-click on the report in solution and select open with > Open with XML Text editor).

In the XML file search for this parameter and carefully remove it from everywhere. If you are not familiar with XML better to take help. Save your changes and build the solution. This time your report should be deployed without any error. 


-Harry Follow us on Facebook to keep in rhythm with us. https:fb.com/theaxapta

January 10, 2023

[Solved] Issue with Database import in Dev Box

[Updated on 19 Oct, 2023]
Hi Folks, 

While trying to import the UAT database into the dev box or any other tier-1 box (You might have tried this MS document), 

*** Changes to connection setting default values were incorporated in a recent release.  More information is available at https://aka.ms/dacfx-connection
*** Error importing database: Could not import package.
Changes to connection setting default values were incorporated in a recent release.  More information is available at https://aka.ms/dacfx-connection
Unable to connect to target server 'localhost'. Please verify the connection information such as the server name, login credentials, and firewall rules for the target server.
A connection was successfully established with the server, but then an error occurred during the login process. (provider: SSL Provider, error: 0 - The certificate chain was issued by an authority that is not trusted.)
The certificate chain was issued by an authority that is not trusted.
*** The settings for connection encryption or server certificate trust may lead to connection failure if the server is not properly configured.


That's because of recent changes in encryption policies on SQL. To fix this issue you need to update the import SQL command below

SqlPackage.exe /a:import /sf:J:\MSSQL_BACKUP\UATbackup.bacpac /tsn:localhost /tdn:AXDB_UAT /p:CommandTimeout=1200 /TargetEncryptConnection:False

Update on 19 Oct, 2023:

Now you have to use the new parameters below 

SqlPackage.exe /a:import /sf:J:\MSSQL_BACKUP\UATbackup.bacpac /tsn:localhost /tdn:AxDb_UAT /p:CommandTimeout=1200 /TargetUser:"axdbadmin" /TargetPassword:"<DB adm pwd>" /TargetTrustServerCertificate:True

-Harry Follow us on Facebook to keep in rhythm with us. https:fb.com/theaxapta