February 28, 2013

Dynamics AX – Passing parameters between object – What is args??

Hi Friends,

ARGS is your friend in the world of AX (me also :) ). It allows you to pass records, the calling locations (form, report, query etc) , ENUMS and the list goes on!  
Simple declaration of args

Args  args = new Args();

Now lets try passing args an record.

select firstonly custTable where custTable.AccountNum == ‘XXXX’
if(custTable)
{
args.record(custTable);
}

Now lets view a snippet of code that passes in a record and runs a report using the record passed in. 
I- Create an instance of the report run class.
Create a new Args instance to hold all of this information. 
Pass the name of the report.
Instantiate the report run object and call the init and and run methods of the report.

II- Next override the init method of the report and put a condition that checks to see if a record was passed to the report from the args object. If so do not allow the user to be interactive with the report and sent the report straight to the screen.

III- Set a report variable eHeader to the record that was passed to the report. If there is no calling record to the report meaning the report is being launched from a menu or elsewhere besides a place with a calling record then allow interaction of the report query for the users to select the range criteria they want to use.

IV- Then override the fetch method and keep the super in place to allow the standard query to run however before the super use a condition to determine if a record has been passed into the report. If so then set a query of a key field to the a field from the record passed in.

V- You can use args to do the same with forms as well
You can pass in objects such as maps to run reports I have done this as well and I find it very helpful and useful

void printPickList(wfsEMPickListHeader  wfsEMPickListHeader)
{
    Args                    args = new args();
    ReportRun               reportRun;
    ;

    args.name(reportStr(wfsEMExportPickList));
    args.caller(this);
    args.record(wfsEMPickListHeader);

    reportRun = classfactory.reportRunClass(args);
    reportRun.init();

    reportRun.run();
}

public void init()
{
    super();
    if(element.args().record())
    {
        this.report().interactive(false);
        this.query().interactive(false);
        this.printJobSettings().preferredTarget(PrintMedium::Screen);
        eHeader = element.args().record();

    }
    else
    {
        this.report().interactive(true);
        this.query().interactive(true);
    }
}

public boolean fetch()
{
    boolean ret;
    if(element.args().record())
    {
        element.query().dataSourceTable(tablenum(wfsEMPickListHeader)).
       addRange(fieldnum(wfsEMPickListHeader,PickListId)).value(eHeader.PickListId);
    }
    ret = super();

    return ret;
}

void wfsRMRunManualTruckLoadIdForm()
{
    wfsWhseUser    wfsWhseUser;
    FormRun        formRun;
    Args           args = new Args();
    boolean        ret = false;
    ;
    args.record(this);
    formRun = new MenuFunction(menuitemdisplaystr(wfsManualTruckLoadSelection),
    MenuItemType::Display).create(args);
    formRun.run();
    formRun.wait();
}

-Harry

February 18, 2013

Error: Error executing code: Wrong argument types for comparison. (C)\Classes\xRecord\toolTipField (C)\Classes\FormDataObject\toolTip (C)\Classes\FormStringControl\ToolTip

Error: Error executing code: Wrong argument types for comparison. (C)\Classes\xRecord\toolTipField (C)\Classes\FormDataObject\toolTip (C)\Classes\FormStringControl\ToolTip


I faced a issue when I select a record on form,
 
Error executing code: Wrong argument types for comparison.


(C)\Classes\xRecord\toolTipField
(C)\Classes\FormDataObject\toolTip
(C)\Classes\FormStringControl\ToolTip


Solution:
Just check your EDT which is your primary key of table. check the relation.
Basically this error will come when you change the field name in table it will not update in your EDT relation.

- Harry 

List view Control in Dynamics AX

Hi Friends,

Here is step by step Tutorial for ListView FormControl.  During this tutorial we create a separate Form (just for testing this tutorial).

ListView Control helps you when you want to select multiple records from a list of records see below image

image

Follow this steps

Step 1: Create a new Form and name it “_ListView”
In design Node, Add a new Control called ListView and name it as “LeftListView” as shown below.


By default -AutoDeclaration property of the ListView will be “Yes”.(Because you have to access this in your code for insert/Access/Delete items from ListView)
Now lets learn some important properties of the listView. Change the View type property from “Icon” to “Report” s shown below.


Save the form and now let’s add coulmns to the list view. Since we have set the autodeclaration property of the LeftListView to “yes”, we can use this control inside the code.

Step 2: Override the init() method of the Example_ListView form and add the below lines of code to add columns to the list View as shown below
LeftListView.addColumn(1,new FormListColumn(‘List of customes’,1, 200));
Refer to the image below for the same.


Step 3: Now let us insert items to the list.
Override the run() method of the form and insert the below lines of code. We are actually fetching all the customer names from the standard CustTable and adding the same to the list.


public void run()
{
CustTable custTable;
;
super();


// Adding items to the list
while select Name from custTable
{
LeftListView.add(custTable.Name);
}

}
Below image is the same for the reference


Now let’s see how the items looks like in our list.
Open the Example_ListView form by using shortcut key “Ctrl + O “
Below image is for your reference.


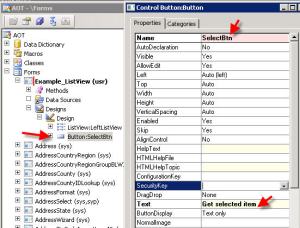
Step 4: Add a new button to the form by Right clicking the design >> Chose Button control. Name the button as SelectBtn and Text property set to “Get selected item” as shown below


Override the clicked() method of the nelwy created button and add the below lines of code. This code will help you to show the selected item by the user in the list upon clicking on the button in the infolog

void clicked()
{
FormListItem item;
int i;
;


super();
i = LeftListView.getNextItem(FormListNext::Selected);
while (i != -1)
{
item = LeftListView.getItem(i);
info (item.text());
i = LeftListView.getNextItem(FormListNext::Selected,i);
}
}


Below is the image for the reference


Note: By default the Listview will not allow the multiple selection of items on the list. To allow users multiple selection, go to the LeftListView control properties and change the property of MultipleSelection from “No” to “Yes” as shown below


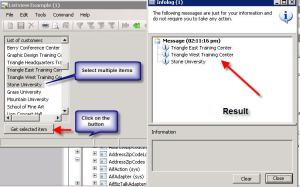
Step 5: Select multiple items in the list[By using shift key] and click on the button to view the selected items by the user in the infolog. Below is the result.


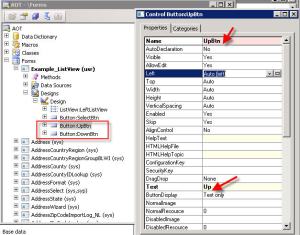
Step 6: Move up and down the items [Arrange] in the list View. To do this add 2 new buttons to the Form. Name them as UpBtn and DownBtn . Provide the text property on the buttons as “Up” and “Down”


On the upBtn >> Overide the Clicked method and paste the below lines of code to move the item up [Select the item in the listview and use Up arrow to move the item upwards]

void clicked()
{
int i = LeftListView.getNextItem(FormListNext::Selected);


LeftListView.moveItem(i, i-1);
}


Similarly on the DownBtn >> Override the clicked method and paste the below code

void clicked()
{
int i = LeftListView.getNextItem(FormListNext::Selected);


LeftListView.moveItem(i, i+1);
}


Moveitem is the method which will help to move or arrange the items in the list through index. If we decrement the index, the item will be moved up and on incrementing the item will move down.
Step 6: Finally, how to move items from one list to another. To do this let’s create one more list in the form by right clicking the desgins and add new ListViewControl . Name the newly created ListView control to “BottomListView” and change the ViewType property of the listView to Report. [Refer to Step 1]
Below is the screen shot for your reference.


Step 7: Now we need to add columns to this newly created list which we did in the Step 2.

Modify the init() method of the form to add the columns to the 
BottonListView
BottomListView.addColumn(1,new FormListColumn(‘Moved customers’,1, 200));

Step 8: Lets add one more button which should help to move item from the LeftListView to ButtonListView.
Create a new button and name it as “MoveBtn” and give the text property as “Move Items” as shown below.


Step 9: Override the clicked() method of the MoveBtn and add the below lines of code to move the items from one list to another.
Business logic : Get the selected item from the LeftlistView. Add to the another list i.e BottomListView. Delete the item/items from the LeftListView.

void clicked()
{
FormListItem item;
int i;
;


super();
i = LeftListView.getNextItem(FormListNext::Selected);
while (i != -1)
{
item = LeftListView.getItem(i);

BottomListView.addItem(item); //Add items to the BottomListView
LeftListView.delete(i); // Delete the selected item from the LeftListView


i = LeftListView.getNextItem(FormListNext::Selected,i);
}
}


-Harry

February 11, 2013

How to pass values between form and report

How to pass values between form and report

Here is for example the code of the button that calls the report:

void clicked ()
{
    Args     args;
    ReportRun          reportRun;
    ;
    super();
    args = new Args();
    args.name(Reportstr(HistoryHolidays));
    args.parm( LogId  );
    reportRun = classfactory.reportRunClass(args);
    reportRun.init();
    reportRun.run();
    reportRun.wait();
    args.parmObject( args );
}

in the init method of your report try this:

public void init()
{
    if( element.args() )
    {
        logId =  element.args().parm();
    }
     super();
}

then you can use this parameter in your report form example: 

public void executeSection()
{
    ;
    if  ( employee_1.LogId == logId)
    {
        emplId = employee_1.empId;
        super();
    }
    if ( logid == "1")
    {
        emplId = DropHoliday_1.EmpId;
        super();
    }
}

You can use this logic in your code for many purpose.

-Harry